Why should your personal Facebook profile contain your author information?
If you’re like most authors, you’ve probably used your personal Facebook profile to join writing-related groups, ‘liked’ Facebook pages that relate to a topic you write about, and so on. These groups and pages almost certainly contain members/followers who aren’t connected to you personally, so those people can only see things in your profile that you’ve made publicly available. That’s great, but it falls down if you want people to be able to find, say, your author website.
As a real-world example, about six months ago I was looking for authors to participate in a ghost-themed story bundle. I know plenty of talented people who could write great ghost stories, but I decided it would be fun to find a few new writers to work with who regularly write ghost stories, like Mark Leslie. I wandered through the various Facebook groups I’m in, found a few authors who sounded like they might fit the bill, and then went to look them up. Most of them either didn’t have links to their author websites on their personal profiles. I was able to find a few of them by googling, but not all, and after a while it got to be too time-consuming to try to track people down. I’m sure I missed a few authors who would have been perfect.
For the record, when I went to look at my own profile I discovered my author website was not visible to people who weren’t already connected to me. 🙂 But it is now!
How do you make author information on your personal profile public?
Here’s how to set your author website and social media links publicly available in your personal Facebook profile.
- Go to your personal Facebook profile.
- Click the ‘About’ button below your cover photo.
- Click on ‘Contact and Basic Info.’
- Make your website public.
- Hover over ‘Websites’ in the ‘Websites and Social Links’ section. An ‘Edit’ button will appear to the right of this line. Click it.
- Enter the URL to your website, if you haven’t already. Note that you can list multiple websites – for example, you might write under multiple pen names, and have one site for each.
- Set the visibility to ‘Public’ by using the dropdown link.
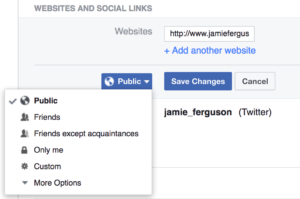
- Click ‘Save Changes.’
- Make your social media links public.
- Hover over ‘Social Links’ in the ‘Websites and Social Links’ section. An ‘Edit’ button will appear to the right of this line. Click it.
- Enter whatever social media links you want to add. Keep in mind that the visibility setting will apply to all of them.
- Set the visibility to ‘Public’ by using the dropdown link.
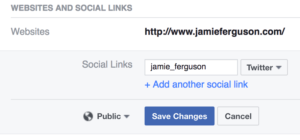
- Click ‘Save Changes.’
You can verify that this worked by viewing what your profile looks like to the public (i.e. anyone, even people who are not connected to you).
- Click the 3 dots to the right of ‘View Activity Log,’ which is on the bottom right side of your cover photo.
- In the dropdown that pops up, click ‘View As.’
- Click on ‘About,’ and verify that the information you specified as public is displayed.
Sign up for the Blackbird Publishing newsletter!